Tuesday, January 28, 2014

Homemade Citrus Soda!

Tired of drinking glass after glass of bland water? Since I don't drink soft drinks or fruit juices filled with tons of sugar and calories I am always coming up with new ways to enjoy water!  Don't get me wrong, I love water! Drinking water comes with so many benefits, I think the only disadvantage would be like anything else too much could kill you..lol.. seriously don't worry, that would be hard to do. Anyways.. sometimes you want something different maybe with carbonation or a little flavor! Like with my Apple Cinnamon Water here is another fun way to spruce up your everyday water, this time with carbonated water. Citrus Soda!


All You Need:
  • Bottle of carbonated water
  • Pitcher
  • Sliced citrus fruit (I like to use Oranges, Lemons & Limes)
To Make:


  •  Slice fruit and place in bottom of pitcher
  • Fill with carbonated water
  • Cover with ice
*You can drink it right away but the longer it sits the more citrus flavor it will have


* I actually make this beverage two different ways, you can also just add the fruit to your bottle of water (after removing some of the water of course) which makes it portable.

Tip- If you leave the fruit in your water too long it will take on a unpleasant rind taste.  If you don't finish your soda within 24 hours remove the fruit to keep the flavor from turning.

Tuesday, January 21, 2014

How To Temper Chocolate!

I never really thought about tempering chocolate.  Even when I started to make chocolate covered snacks I didn't think it was necessary for the recipes I was creating... I was wrong.  The main reason I began to research tempering chocolate was because I couldn't get my chocolate covered berries not to melt within seconds of putting them in my hand.  Aside from raising the melting temperature so your chocolate melts in your mouth, not in your hands, tempering has a few other advantages.

  • You will avoid fat and sugar bloom, the unappealing white streaks and or blotches that can unattractively take over perfectly good chocolate.
  • Tempered chocolate cools faster
  • It gives your chocolate a shiny, glossy appearance.
  • Your chocolate will have a clean snap when you break it.

It seems like a daunting task but it really isn't.  Also since I don't make large quantities at a time the heating and cooling process is very short. 
  1. Use a double boiler or just rest a metal bowl over a saucepan with 1 inch of water.  Bring the water to a simmer, then add half of your chocolate to the bowl and stir till its smooth and melted. Put the other half of your chocolate to the side for later. Using a thermometer bring your chocolate to the correct temperature: 115°-120° then remove it from the heat.
  2. Now you want to add the other half of the chocolate you put aside. This is the seeding process and helps to bring the chocolate temperature down. Continue to stir until smooth. 
  3. The last step is to bring your chocolate back up to the perfect temperature, for most dark chocolate it's between 88° and 91°.  To do this just place the bowl back over your hot water and stir till you reach the desired temperature.  Then you are done and ready to create whatever chocolate creations you can dream of.
 *You can also temper chocolate using your microwave like in this instructional video below

Tuesday, January 14, 2014

How To Clarify Butter!

What is clarified butter? Clarified butter (also known as ghee) is butter with the milk solids and water removed.  It is a great choice for cooking and able to withstand higher temperatures than regular butter or other oils such as coconut oil.  Clarified butter is one of my favorite things to cook with when eating Paleo, it adds a great mild buttery flavor and is simple to make. literally..
Step 1: Melt
Step 2: Strain
Step 3: Store


While it may seem like a lot of work or a hassle it is quite easy, quick and last for a while. Plus it could help your digestion, improve your flexibility, boost your immune system and moisturize your skin!

1. You want to heat your butter in a saucepan over low heat until it melts. Then allow it to simmer as the white "foam" rises to the surface.  I usually make a pound at a time. (though it is less than a pound once clarified)
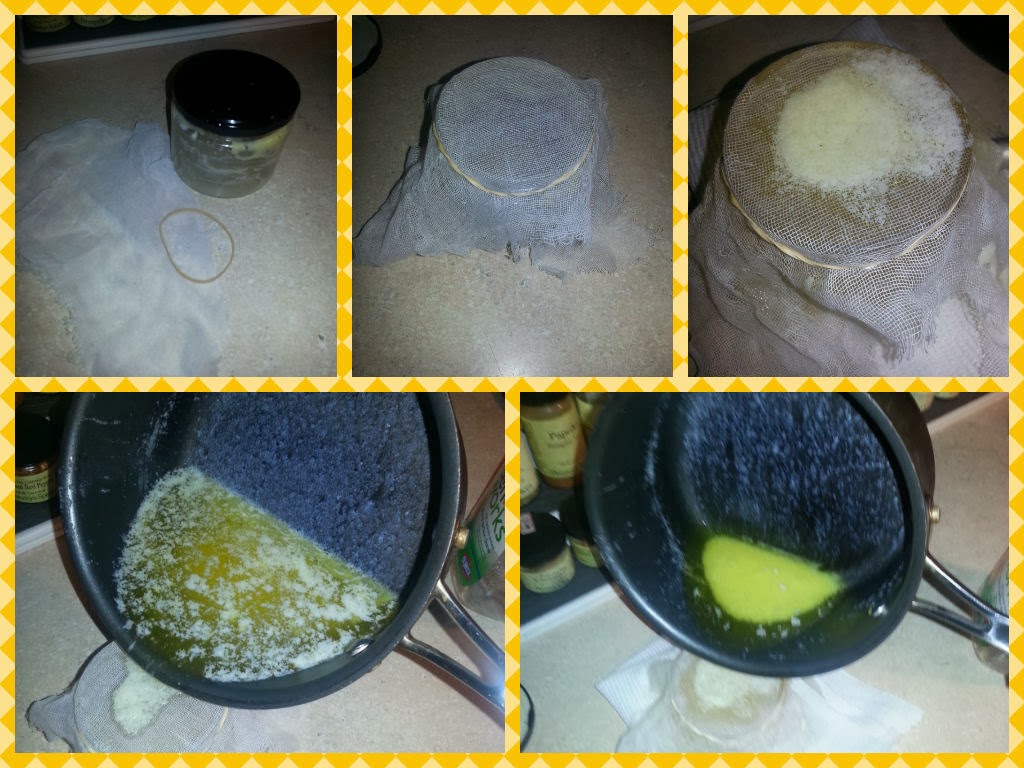
2.  Once the all the foam has risen (this takes about 10 minutes) you will have three layers.  All the milk solid sediment will be at the bottom of the pan with a layer of golden liquid under the foam. You can skim the foam off with a slotted spoon but I don't like to do it that way.  If you want to skim it off as it forms i suggest using a mesh skimmer.  I prefer waiting the 10 minutes and then straining it though cheesecloth.


4. Using a rubber-band I just secure the cheesecloth around the opening of my "clarified butter jar" and slowly pour the butter into the jar. You will notice the white foam being trapped on top of the cheesecloth. You also want to leave behind that bottom layer of solids so stop straining when you get to the end of the clear liquid gold.


* Clarified butter will keep for 3 to 6 months in the refrigerator, you can also leave it at room temperature on your counter like I do if the conditions are optimal, or freeze it for a similar length of time.


  • * Traditionally, you will find that you should use unsalted Butter when clarifying butter. While I have made it using both salted and unsalted I traditionally use salted.  I don't find that the salt is intensified after being clarified but it may be because I strongly dislike unsalted butter to begin with.

  • Would you clarify your butter?

    Sunday, January 12, 2014

    Homemade Italian Salad Dressing!

    This is a simple recipe to make your own homemade Italian salad dressing that is also Paleo.  It is a fresh and preservative free take on the same bottle versions you may buy at the store and also works as a great marinade.


    You Need:
    1 teaspoon garlic powder
    1 teaspoon onion powder
    1 teaspoon raw honey
    2 teaspoons dried oregano
    1/4 teaspoon ground black pepper
    1/4 teaspoon salt
    1/8 teaspoon dried thyme
    1/4 teaspoon dried basil
    1 teaspoon dried parsley
    1/4 cup vinegar (white, red wine, or balsamic)
    2/3 cup olive oil


    I like to use a hand mixer to emulsify it all together. You can also use a blender or just combine everything in a bottle and shake it up.  If you can, allow it to sit so the dried herbs soften.  Then just store on the counter. (olive oil will solidify in the refrigerator)