Showing posts with label Tuesday's Tip. Show all posts

Tuesday, October 20, 2015

How To Roast Pumkin Seeds!

I must admit, my favorite part about carving pumpkins is getting to roast and eat the seeds! They are so yummy and easy to make.  Below is my simple and easy recipe for making the perfect roasted pumpkin seeds.


What you need
  • 1 Medium Sized Pumpkin
  • Colander
  • Medium Bowl
  • Baking Sheet
  • Tin Foil
  • Paper Towel
Ingredients
  • 2 Tbsp Olive Oil  
  • 1/2 Tsp Kosher Salt
Empty the "guts" of your pumpkin into a colander.  Under cool running water clean the pumpkin seeds, removing any pumpkin pieces.  Once your seeds are clean, lay them out on a paper towel and pat them dry.  This will help them bake easier and more evenly.  Once you are done drying the seeds place them in a medium sized mixing bowl.


Add the Olive oil and Salt, then toss or stir until the seeds are evenly coated.

Once coated, evenly spread out your pumpkin seeds on a baking tray lined with tin foil.


Bake your seeds at 300'F for 40 minutes, stirring after 20 minutes, or until golden brown.


 ENJOY!

Wednesday, April 1, 2015

How To Naturally Dye Easter Eggs!

It's that time of year again and why not try some natural methods for dying Easter eggs this year. Forget using harsh synthetic colors and dyes, natural coloring derived from food can produce sweet, subtle hues that are sure to please anyone.


There are three easy methods to dye eggs naturally.

1) Hot Dying Method (use uncooked eggs)
Using a saucepan, add 1 quart water, 2 Tablespoons of vinegar and dye material. Using cold (uncooked) eggs, make sure the liquid covers the eggs. Simmer slowly for 15 minutes before removing eggs to cool.

2) Cold Dying Method (Use cooked eggs)
In a saucepan add 1 quart of water, 2 Tablespoons of vinegar and dye ingredient.  Bring the contents of your sauce pan to a boil.  Reduce the heat to low and simmer for 20-30 minutes.  Strain out your dye ingredient and cool.  Submerge hard boiled eggs into the cooled dye until the color strength you want is achieved.  Turn eggs occasionally to ensure even coverage.  Remove from dye and dry.

3) Silk-tie method: (Use uncooked eggs)
Textile fabrics like silk will release their dye when vinegar is added to the cooking water.
  • Cut silk (like from a tie) into a square large enough to wrap around a raw egg.
  • Place the printed side facing the egg, wrap the the silk around your egg and secure using twist ties.
  • Cut a piece of white fabric larger than the silk piece to go around your egg, then lay the silk-covered egg on the white fabric, bring up the sides and secure again using a twist tie.
  • Place eggs in a glass or enamel pan, cover with water and add 1/4 cup of white vinegar.
  • Bring water to a boil and simmer for 20 minutes.
  • Remove eggs from water using tongs and allow to cool.
  • Remove fabrics from eggs and let them continue to cool on a rack.
For each color, use one of the suggested dye materials per 1 quart of water.  For amounts not provided below, use enough dye material to create the desired color.  Keep in mind that color of the egg will be lighter than the color of the dye bath.

Yellow:
  • Orange or lemon peels, boiled
  • 2 Tbsp ground tumeric
  • Chamomile tea or Green tea
  • 4 cups yellow onion skin (makes a yellow/orange color)
Orange:
  • 4 Tbsp paprika
  • Grated carrots
  • 3 Tbsp chili powder (makes a red/orange color)
Pink:
  • 1 cup chopped fresh beets
  • Cranberries or cranberry juice
  • 4 cups red onion skin
  • Red grape juice or Red wine
Lavender:
  • Purple grape juice
  • Red tea
Violet Blue:
  • Red wine
  • Violet blossoms
  • Red onion skins
Blue:
  • 1&1/2 cups blueberries, fresh or canned
  • 4 cups red shredded cabbage
Green:
  • 1 cup blueberries (add grape juice for more intensity)
Gold/Brown:
  • Dill seeds
Mocha:
  • 1 quart strongly brewed coffee or strong black tea
TIPS:

You can make a drying rack by cutting up a paper towel tube into rings and allowing your eggs stand on rings to dry.

Give your eggs a glossy finish by rubbing a little vegetable oil on them using a paper towel once they are dry.


* Refrigerate your cooked eggs! You do not want to keep your eggs out of the refrigerator for more than 2 hours.  Throw away eggs that have been out too long, better safe than sorry!

What do you think?  Have you ever colored your Easter eggs naturally? Would you ever consider using natural ingredients to make dyes verse synthetic dyes you buy in stores?

Tuesday, October 7, 2014

How To Make Almond Milk!

Many people seem to be switching over to nut milks lately. One of my favorites is Almond Milk! It is a great substitute for dairy milk but is also great all on its own.  I very rarely drink dairy milk these days and always seem to have Almond milk in my refrigerator.  I tend to use almond milk most often for protein shakes and smoothies.  It has a wonderful flavor and a creamy consistency with less fat and calories than dairy milk.

Bonus: Almond milk contains a wide variety of essential vitamins and minerals!


 I have been drinking nut milks for some time now and I find myself less and less likely to buy them from a store.  The basic ingredients consist of the chosen nut, water and sweetener, yet its hard to find a brand with that few ingredients.  Obviously they would need to include a preservative to help keep them shelf stable but I don't like buying things, even "healthy alternatives" riddled with chemicals and ingredients I can not pronounce. You may think it would be a hard and time consuming ordeal to make your own fresh almond milk, however it is not. How do you make almond milk? Here is my quick and easy guide to making fresh homemade, creamy, delicious almond Milk! 

Bonus: Aside from avoiding unwanted chemicals you will save money too!


What do you need to make almond milk?

You can make as much or as little as you want.  When making almond milk you can choose to use blanched almonds (skins removed) or regular almonds (skin still on). The only difference between using almonds with or without skins when making almond milk is that you may need to strain your milk a bit more if you use regular almonds.  I don't find that it changes much.  For this post I made a small batch. I used one small bag of regular Almonds (about 1 cup)


Ingredients
Raw Almonds (uncooked & unsalted)
Filtered Water
Vanilla
 *Sweeteners if desired (dates, honey, agave, maple syrup or cinnamon) 1tsp or to taste

Equipment
Bowls
Mesh Strainer
Blender or food processor
Cheese cloth or Nut bag


To make almond milk there are only a few easy steps.

Soak the almonds.  You want to soak your almonds overnight for at least 8 hours. To do this place your almonds in a container or bowl, then fill with filtered water.  You will want to add about an inch or two of water above the almonds since they will absorb the water and grow in size.

Drain the almonds. After the almonds have soaked you want to drain and rinse them under cool water. 


Blend the almonds. Pour your almonds in a blender and cover with water. I like to use about a 3-1 ratio during this step.  If I started with 1 cup of dry Almonds I would add about 3 cups of filtered water to the blender.  For 2 cups of dry almonds I would use close to 6 cups of water.

Blend the almonds and water on the highest speed for at least 2 minutes. Your almonds should completely break down and the liquid should be white and opaque.  

Strain the almonds. Place a fine mesh strainer lined with cheese cloth over a bowl and pour the almond/water mixture through it.  Once all the liquid has drained through, gather the excess cheese cloth and twist the remaining almond meal into a ball to remove more liquid.  You can continue to twist and squeeze more liquid from the pulp with your hands.


Sweeten the milk. Once you have finished straining all the liquid you will want to taste it.  If you prefer a sweeter flavor you can add a flavoring and or sweetener Pour the liquid back into your blender, add the flavoring or sweetener and blend for about 15 seconds.  For this post I added a tsp of vanilla to my milk.  If you like you can quickly strain the milk again to achieve an even cleaner finished product.

Store your almond milk. You want to store your almond milk in sealed container in the refrigerator.  Your almond milk should last for about 3-5 days since there are no chemicals or preservatives.  This also means that your milk will settle.  You will want to shake the milk up before each use.  If you notice it tastes at all sour you will want to discard it and make a fresh batch. 


TIP: Don't just throw away the remaining almond meal that is left behind.  It can be added to a multitude of things such as cookies, muffins, oatmeal, pancakes and smoothies. You can dry it as well in the oven then freeze for future baking needs.  Stay tuned for posts about ways to use left over almond meal.

Do you drink nut milks? Would you consider making your own?

Tuesday, January 28, 2014

Homemade Citrus Soda!

Tired of drinking glass after glass of bland water? Since I don't drink soft drinks or fruit juices filled with tons of sugar and calories I am always coming up with new ways to enjoy water!  Don't get me wrong, I love water! Drinking water comes with so many benefits, I think the only disadvantage would be like anything else too much could kill you..lol.. seriously don't worry, that would be hard to do. Anyways.. sometimes you want something different maybe with carbonation or a little flavor! Like with my Apple Cinnamon Water here is another fun way to spruce up your everyday water, this time with carbonated water. Citrus Soda!


All You Need:
  • Bottle of carbonated water
  • Pitcher
  • Sliced citrus fruit (I like to use Oranges, Lemons & Limes)
To Make:


  •  Slice fruit and place in bottom of pitcher
  • Fill with carbonated water
  • Cover with ice
*You can drink it right away but the longer it sits the more citrus flavor it will have


* I actually make this beverage two different ways, you can also just add the fruit to your bottle of water (after removing some of the water of course) which makes it portable.

Tip- If you leave the fruit in your water too long it will take on a unpleasant rind taste.  If you don't finish your soda within 24 hours remove the fruit to keep the flavor from turning.

Tuesday, January 21, 2014

How To Temper Chocolate!

I never really thought about tempering chocolate.  Even when I started to make chocolate covered snacks I didn't think it was necessary for the recipes I was creating... I was wrong.  The main reason I began to research tempering chocolate was because I couldn't get my chocolate covered berries not to melt within seconds of putting them in my hand.  Aside from raising the melting temperature so your chocolate melts in your mouth, not in your hands, tempering has a few other advantages.

  • You will avoid fat and sugar bloom, the unappealing white streaks and or blotches that can unattractively take over perfectly good chocolate.
  • Tempered chocolate cools faster
  • It gives your chocolate a shiny, glossy appearance.
  • Your chocolate will have a clean snap when you break it.

It seems like a daunting task but it really isn't.  Also since I don't make large quantities at a time the heating and cooling process is very short. 
  1. Use a double boiler or just rest a metal bowl over a saucepan with 1 inch of water.  Bring the water to a simmer, then add half of your chocolate to the bowl and stir till its smooth and melted. Put the other half of your chocolate to the side for later. Using a thermometer bring your chocolate to the correct temperature: 115°-120° then remove it from the heat.
  2. Now you want to add the other half of the chocolate you put aside. This is the seeding process and helps to bring the chocolate temperature down. Continue to stir until smooth. 
  3. The last step is to bring your chocolate back up to the perfect temperature, for most dark chocolate it's between 88° and 91°.  To do this just place the bowl back over your hot water and stir till you reach the desired temperature.  Then you are done and ready to create whatever chocolate creations you can dream of.
 *You can also temper chocolate using your microwave like in this instructional video below

Tuesday, January 14, 2014

How To Clarify Butter!

What is clarified butter? Clarified butter (also known as ghee) is butter with the milk solids and water removed.  It is a great choice for cooking and able to withstand higher temperatures than regular butter or other oils such as coconut oil.  Clarified butter is one of my favorite things to cook with when eating Paleo, it adds a great mild buttery flavor and is simple to make. literally..
Step 1: Melt
Step 2: Strain
Step 3: Store


While it may seem like a lot of work or a hassle it is quite easy, quick and last for a while. Plus it could help your digestion, improve your flexibility, boost your immune system and moisturize your skin!

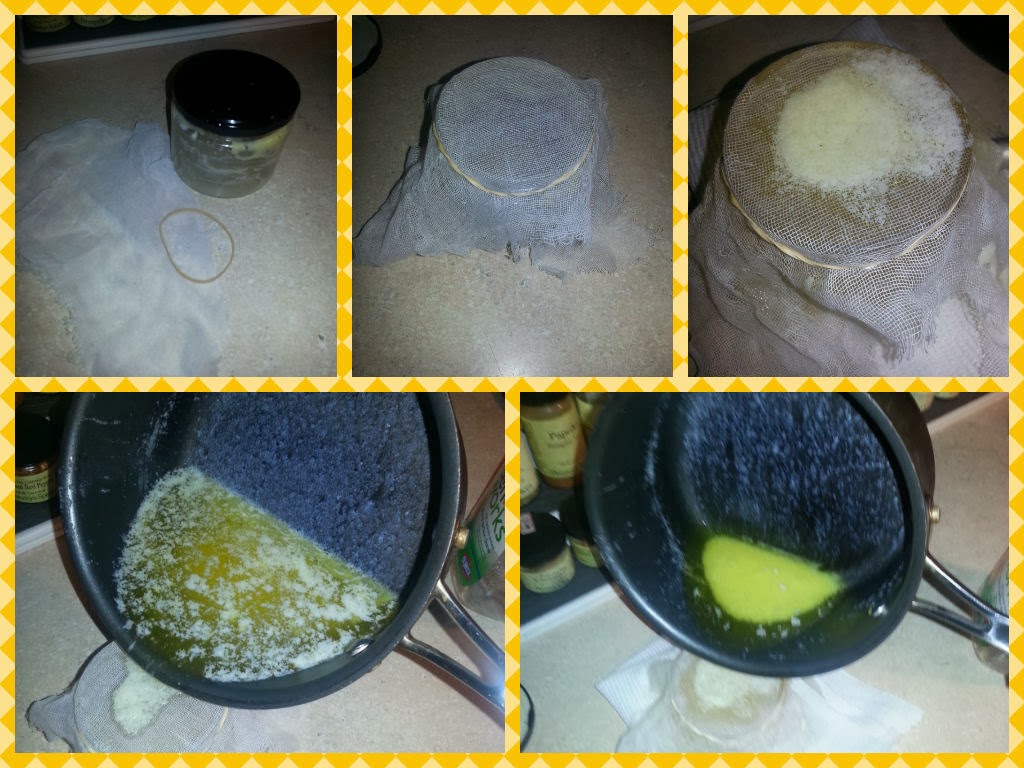
1. You want to heat your butter in a saucepan over low heat until it melts. Then allow it to simmer as the white "foam" rises to the surface.  I usually make a pound at a time. (though it is less than a pound once clarified)
2.  Once the all the foam has risen (this takes about 10 minutes) you will have three layers.  All the milk solid sediment will be at the bottom of the pan with a layer of golden liquid under the foam. You can skim the foam off with a slotted spoon but I don't like to do it that way.  If you want to skim it off as it forms i suggest using a mesh skimmer.  I prefer waiting the 10 minutes and then straining it though cheesecloth.


4. Using a rubber-band I just secure the cheesecloth around the opening of my "clarified butter jar" and slowly pour the butter into the jar. You will notice the white foam being trapped on top of the cheesecloth. You also want to leave behind that bottom layer of solids so stop straining when you get to the end of the clear liquid gold.


* Clarified butter will keep for 3 to 6 months in the refrigerator, you can also leave it at room temperature on your counter like I do if the conditions are optimal, or freeze it for a similar length of time.


  • * Traditionally, you will find that you should use unsalted Butter when clarifying butter. While I have made it using both salted and unsalted I traditionally use salted.  I don't find that the salt is intensified after being clarified but it may be because I strongly dislike unsalted butter to begin with.

  • Would you clarify your butter?

    Tuesday, October 29, 2013

    Keep Produce Fresher Longer!

    Being that I eat Paleo I am constantly buying produce.  The problem is, its hard to use everything before it starts to go bad.  No matter what kind of diet you follow, we could all benefit from learning how to extend the life of our fruits and vegetables.  Luckily for us the Ecology Center in Berkeley has put together a cheat sheet of tips to help us lengthen the longevity of our fruit and vegetables. 

    Fruit:
    Apples‐storeonacoolcounterorshelfforuptotwoweeks.Forlongerstorageina
    cardboardboxinthefridge.
    Citrus‐storeinacoolplace,withgoodairflow,neverinanair‐tightcontainer.
    Apricots‐onacoolcountertoroomtemperatureorfridgeiffullyripe
    Cherries‐ storeinanairtightcontainer.Don’twashcherriesuntilreadytoeat,anyadded
    moistureencouragesmold.
    Berries-­Don’tforget,they’refragile.Whenstoringbecarefulnottostacktoomanyhigh,a
    singlelayerifpossible.Apaperbagworkswell,onlywashbeforeyouplanoneating
    them.
    Dates‐ dryerdates(likeDegletNoor)arefinestoredoutonthecounterinabowlorthe
    paperbagtheywereboughtin.
    Moistdates(likeMedjool)needabitofrefrigerationifthey’regoingtobestored
    overaweek,eitherinclothorapaperbag‐aslongasit’sporoustokeepingthe
    moistureawayfromtheskinofthedates.
    Figs‐Don’tlikehumidity,so,noclosedcontainers.Apaperbagworkstoabsorbexcess
    moisture,butaplateworksbestinthefridgeuptoaweekun‐stacked.
    Melons‐uncutinacooldryplace,outofthesunuptoacoupleweeks.Cutmelonsshouldbe
    inthefridge,anopencontainerisfine.
    Nectarines‐(similartoapricots)storeinthefridgeisokayifripe,butbesttakenoutaday
    ortwobeforeyouplanoneatingthemsotheysoftentoroomtemperature.
    Peaches (andmoststonefruit)‐refrigerateonlywhenfullyripe.Morefirmfruitwillripen
    onthecounter.
    Pears‐willkeepforafewweeksonacoolcounter,butfineinapaperbag. Tohastenthe
    ripeningputanappleinwiththem.
    Persimmon‐Fuyu‐ (shorter/pumpkinshaped):storeatroomtemperature.
    Hachiya‐(longer/pointedend):roomtemperatureuntilcompletelymushy.The
    astringentnessofthemonlysubsideswhentheyarecompletelyripe.

Tohastenthe
    ripeningprocessplaceinapaperbagwithafewapplesforaweek,checknowand
    then,butdon’tstack‐theygetveryfragilewhenreallyripe.
    Pomegranates‐keepuptoamonthstoredonacoolcounter.
    Strawberries‐Don’tliketobewet.Dobestinapaperbaginthefridgeforuptoaweek‐
    checkthebagformoistureeveryotherday.


    Veggies:
    Artichokes‐placeinanairtightcontainersealed,withlightmoisture.
    Asparagus‐placethemlooselyinaglassorbowluprightwithwateratroomtemperature.
    (willkeepforaweekoutsidethefridge)
    Avocados‐placeinapaperbagatroomtemp.

Tospeeduptheirripening‐placeanapplein
    thebagwiththem.
    Arugula‐ arugula,likelettuce,should notstaywet!Dunkincoldwaterandspinorlayflatto
    dry.Placedryarugulainanopencontainer,wrappedwithadrytoweltoabsorbany
    extramoisture.
    Basil‐isdifficulttostorewell.Basildoesnotlikethecold,ortobewetforthatmatter.The
    bestmethodhereisanairtightcontainer/jarlooselypackedwithasmalldamp
    pieceofpaperinside‐leftoutonacoolcounter.
    Beans,shellingopencontainerinthefridge,eatASAP.Somerecommendfreezingthemif
    notgoingtoeatrightaway
    Beets‐cutthetopsofftokeepbeetsfirm,(besuretokeepthegreens!)byleavinganytopon
    rootvegetablesdrawsmoisturefromtheroot,makingthemlooseflavorandfirmness.
    Beetsshouldbewashedandkeptinandopencontainerwithawettowelontop.
    Beetgreens‐placeinanairtightcontainerwithalittlemoisture.
    Broccoli‐placeinanopencontainerinthefridgeorwrapinadamptowelbeforeplacingin
    thefridge.
    BroccoliRabe‐leftinanopencontainerinthecrisper,butbestusedassoonaspossible.
    BrusselsSprouts‐Ifboughtonthestalkleavethemonthatstalk.Putthestalkinthefridge
    orleaveitonacoldplace.Ifthey’reboughtloosestoretheminanopencontainer
    withadamptowelontop.
    Cabbage‐leftoutonacoolcounterisfineuptoaweek,inthecrisperotherwise.

Peeloff
    outerleavesiftheystarttowilt.Cabbagemightbegintolooseitsmoistureaftera
    week,so,bestusedassoonaspossible.
    Carrots‐cutthetopsofftokeepthemfreshlonger.Placetheminclosedcontainerwith
    plentyofmoisture,eitherwrappedinadamptowelordunkthemincoldwater
    everycoupleofdaysifthey’restoredthatlong.
    Cauliflower‐willlastawhileinaclosedcontainerinthefridge,buttheysaycauliflowerhas
    thebestflavorthedayit’sbought.
    Celery‐doesbestwhensimplyplacesinacuporbowlofshallowwateronthecounter.
    Celeryroot/Celeriac‐wraptherootinadamptowelandplaceinthecrisper.
    Corn‐leaveunhuskedinanopencontainerifyoumust,butcornreallyisbestthedayit’s
    picked.
    Cucumber‐wrappedinamoisttowelinthefridge.Ifyou’replanningoneatingthemwithin
    adayortwoafterbuyingthemtheyshouldbefineleftoutinacoolroom.
    Eggplant‐doesfineleftoutinacoolroom.Don’twashit,eggplantdoesn’tlikeanyextra
    moisturearounditsleaves.Forlongerstorage‐placeloose,inthecrisper.
    Favabeans‐placeinanairtightcontainer.
    Fennel‐ifusedwithinacoupledaysafterit’sboughtfennelcanbeleftoutonthecounter,
    uprightinacuporbowlofwater(likecelery).Ifwantingtokeeplongerthanafew
    daysplaceinthefridgeinaclosedcontainerwithalittlewater.
    Garlic‐ storeinacool,dark,place.
    Greengarlic‐ anairtightcontainerinthefridgeorleftoutforadayortwoisfine,bestbefore
    driedout.
    Greens‐ removeanybands,twistties,etc.mostgreensmustbekeptinanair‐tight
    containerwithadampcloth‐tokeepthemfromdryingout.Kale,collards,andchard
    evendowellinacupofwateronthecounterorfridge.
    Greenbeans‐theylikehumidity,butnotwetness.Adampclothdrapedoveranopenor
    looselyclosedcontainer.
    GreenTomatoes‐storeinacoolroomawayfromthesuntokeepthemgreenanduse
    quicklyortheywillbegintocolor.
    Herbs-­aclosedcontainerinthefridgetokeptuptoaweek.Anylongermightencourage
    mold.
    Lettuce‐keepdamp inanairtightcontainerinthefridge.
    Leeks‐ leaveinanopencontainerinthecrisperwrappedinadampclothorinashallowcup
    ofwateronthecounter(justsotheverybottomofthestemhaswater).
    Okra‐doesn’tlikehumidity.Soadrytowelinanairtightcontainer.Doesn’tstorethatwell,
    besteatenquicklyafterpurchase
    Onion‐storeinacool,darkanddry,place‐goodaircirculationisbest,sodon’tstackthem.
    Parsnips‐ anopencontainerinthecrisper,or,likeacarrot,wrappedinadampclothinthe
    fridge.
    Potatoes‐(likegarlicandonions)storeincool,darkanddryplace,suchas,aboxinadark
    cornerofthepantry;apaperbagalsoworkswell.
    Radicchio‐placeinthefridgeinanopencontainerwithadampclothontop.
    Radishes‐removethegreens(storeseparately)sotheydon’tdrawoutexcessmoisture
    fromtherootsandplacetheminaopencontainerinthefridgewithawettowel
    placedontop.
    Rhubarb‐ wrapinadamptowelandplaceinanopencontainerintherefrigerator.
    Rutabagasinanidealsituationacool,dark,humidrootcellaroraclosedcontainerinthe
    crispertokeeptheirmoisturein.
    Snappeas‐refrigerateinanopencontainer
    Spinach‐storelooseinanopencontainerinthecrisper,coolassoonaspossible.Spinach
    lovestostaycold.
    Springonions‐Removeanybandortieandplaceinthecrisper.
    SummerSquash‐doesfineforafewdaysifleftoutonacoolcounter,evenaftercut.
    Sweetpeppers‐Onlywashthemrightbeforeyouplanoneatingthemaswetnessdecreases
    storagetime.Storeinacoolroomtouseinacoupleadays,placeinthecrisperif
    longerstorageneeded.
    SweetPotatoes‐Storeinacool,dark,well‐ventilatedplace.Neverrefrigerate‐‐sweet
    potatoesdon’tlikethecold.
    Tomatoes‐Neverrefrigerate.Dependingonripeness,tomatoescanstayforuptotwo
    weeksonthecounter.Tohastenripenessplaceinapaperbagwithanapple.
    Turnips‐removethegreens(storeseparately)sameasradishesandbeets,storetheminan
    opencontainerwithamoistcloth.
    Wintersquash‐ storeinacool,dark,wellventilatedplace.Manygrowerssaywinter
    squashesgetsweeterifthey’restoredforaweekorsobeforeeaten.
    Zucchini‐doesfineforafewdaysifleftoutonacoolcounter,evenaftercut.Wrapinacloth andrefrigerateforlongerstorage.

    What did you find most helpful?