Showing posts with label Crafts. Show all posts

Sunday, October 25, 2015

How To Drill A Pumpkin Lantern!

Last year my mom gave me a great idea when it came to carving my pumpkin.  Instead of the traditional jack-o-lantern we instead made a beautiful lantern out of a fantasy pumpkin.  This is such an easy project that yields a unique and beautiful holiday decoration.  Using a power drill and simply making holes in your pumpkin you can create whatever type of design you want.  It doesn't matter what size bit you use either.  Large or small works, and you can even use multiple sizes to create a fun look.  The best thing about this project is there is no right way to do it.  If you want you can create a design with your holes, make symmetrical lines or just make holes at random.


What you need:
A pumpkin
A Serrated Knife
A Large Spoon or Scoop
A Bowl
A Power Drill
A Candle


Using the serrated knife carve open the top of your pumpkin on a diagonal angel, this will keep the lid of your lantern from falling into the pumpkin once its scooped out.  Then scoop out the "guts" and seeds into your bowl.  Make sure to save your seeds so you can make ROASTED PUMPKIN SEEDS. Once you have removed all of the insides, using the side of your spoon try to even out the inside lining of your pumpkin.  This will help the light to escape later.

 
 Using whatever size drill bit you choose begin making holes.  Larger bits, are the easiest and will produce more light.  If you want a smaller more delicate look i would recommend making more holes. I used a 1/4 inch drill bit to make my holes in a random pattern going around my pumpkin.  If you want to be more methodical in your design I recommend using a marker to make a stencil on your pumpkin.


Once you are through drilling holes you will want to wipe of your pumpkin and remove any debris that may have fallen inside your pumpkin.


Now you are ready to light up your lantern.  I used a large votive in my pumpkin but you can also use one or more tea lights depending on how much light you want to shine through.


Now place outside for all your neighbors to see and be in awe of.


I didn't get a picture of my pumpkin lite up at night but here are some great photos of what drilled pumpkins look like!


Wednesday, April 1, 2015

How To Naturally Dye Easter Eggs!

It's that time of year again and why not try some natural methods for dying Easter eggs this year. Forget using harsh synthetic colors and dyes, natural coloring derived from food can produce sweet, subtle hues that are sure to please anyone.


There are three easy methods to dye eggs naturally.

1) Hot Dying Method (use uncooked eggs)
Using a saucepan, add 1 quart water, 2 Tablespoons of vinegar and dye material. Using cold (uncooked) eggs, make sure the liquid covers the eggs. Simmer slowly for 15 minutes before removing eggs to cool.

2) Cold Dying Method (Use cooked eggs)
In a saucepan add 1 quart of water, 2 Tablespoons of vinegar and dye ingredient.  Bring the contents of your sauce pan to a boil.  Reduce the heat to low and simmer for 20-30 minutes.  Strain out your dye ingredient and cool.  Submerge hard boiled eggs into the cooled dye until the color strength you want is achieved.  Turn eggs occasionally to ensure even coverage.  Remove from dye and dry.

3) Silk-tie method: (Use uncooked eggs)
Textile fabrics like silk will release their dye when vinegar is added to the cooking water.
  • Cut silk (like from a tie) into a square large enough to wrap around a raw egg.
  • Place the printed side facing the egg, wrap the the silk around your egg and secure using twist ties.
  • Cut a piece of white fabric larger than the silk piece to go around your egg, then lay the silk-covered egg on the white fabric, bring up the sides and secure again using a twist tie.
  • Place eggs in a glass or enamel pan, cover with water and add 1/4 cup of white vinegar.
  • Bring water to a boil and simmer for 20 minutes.
  • Remove eggs from water using tongs and allow to cool.
  • Remove fabrics from eggs and let them continue to cool on a rack.
For each color, use one of the suggested dye materials per 1 quart of water.  For amounts not provided below, use enough dye material to create the desired color.  Keep in mind that color of the egg will be lighter than the color of the dye bath.

Yellow:
  • Orange or lemon peels, boiled
  • 2 Tbsp ground tumeric
  • Chamomile tea or Green tea
  • 4 cups yellow onion skin (makes a yellow/orange color)
Orange:
  • 4 Tbsp paprika
  • Grated carrots
  • 3 Tbsp chili powder (makes a red/orange color)
Pink:
  • 1 cup chopped fresh beets
  • Cranberries or cranberry juice
  • 4 cups red onion skin
  • Red grape juice or Red wine
Lavender:
  • Purple grape juice
  • Red tea
Violet Blue:
  • Red wine
  • Violet blossoms
  • Red onion skins
Blue:
  • 1&1/2 cups blueberries, fresh or canned
  • 4 cups red shredded cabbage
Green:
  • 1 cup blueberries (add grape juice for more intensity)
Gold/Brown:
  • Dill seeds
Mocha:
  • 1 quart strongly brewed coffee or strong black tea
TIPS:

You can make a drying rack by cutting up a paper towel tube into rings and allowing your eggs stand on rings to dry.

Give your eggs a glossy finish by rubbing a little vegetable oil on them using a paper towel once they are dry.


* Refrigerate your cooked eggs! You do not want to keep your eggs out of the refrigerator for more than 2 hours.  Throw away eggs that have been out too long, better safe than sorry!

What do you think?  Have you ever colored your Easter eggs naturally? Would you ever consider using natural ingredients to make dyes verse synthetic dyes you buy in stores?

Monday, June 3, 2013

Creative Shoe Organizer!

Here is a neat idea I came across for storing and organizing your shoes :)


Cut
Bend
Twist
Cover with decorative duck tape
Hang
Enjoy!

Friday, March 29, 2013

Natural Egg Dyes!

It's that time of year again and why not try some natural methods for dying Easter eggs this year. Forget using harsh synthetic colors and dyes, natural coloring derived from food can produce sweet, subtle hues that are sure to please anyone!  Check out our post from last year on Natural Dyes!


Monday, September 24, 2012

Can I Grrow My Own Garlic?

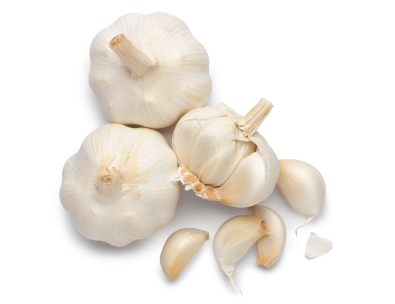
Like I stated in my post yesterday Grow Your Own Garlic? I wanted to try it for myself.  So last night  I planted my own cloves to see if they will grow.

It really was easy!

Using a square glass vase that I had, I filled it with potting soil I also happened to have.  The soil was a bit dry so using a spray bottle i misted water throughout the soil to add some moisture.

Since I am using a container that is bigger than a small plant pot I decided to try and double my chances by using two garlic cloves.  This was also easy since I always have fresh garlic on hand in the kitchen.
 Simply peel the skins off the garlic cloves.  This was a bit funny for me, I haven't peeled garlic in a long time since becoming favorable to quickly pressing each clove with a large knife to remove the skin when using the garlic for cooking.  Obviously that method wont work in this situation.


I made a small hole and placed the clove inside with the pointy end facing up, then covered the clove with a thin layer of soil.  I did the same with the second clove.


When I was done I again misted the top layer of soil with a little water, hopefully to jump start the growing process.


After that it is out of my hands.  I placed the vase in a window where it can receive ample sun light and now I wait!


You can follow my hopeful success, I will be posting all the highlights of this adventure on my Hungry For Living Facebook Page!

Sunday, September 23, 2012

Grow your own Garlic?


Did you know that you can grow your own garlic? Supposedly one planted clove can produce up to  twenty cloves! It doesn't seem very hard, So I am going to try this out for myself and keep you updated on the process over at my Hungry For Living Facebook Page.

It doesn't seem that difficult to cultivate your own garlic at home.  Here is how you can try it yourself!
 Simply plant a garlic clove in a small pot. If the clove has started to sprout that is even better. If your cloves have yet to begin to sprout you just want to make sure to plant them with the pointy end up. If you have a bigger pot or flower box you can plant multiple cloves, just make sure to plant them a few inches apart.  You can also plant them in a garden if you have the space.
 You want to make sure it is placed in a location that gets a lot of sun and that the soil isn't too damp.

If you plant your clove inside water it occasionally like you would an indoor plant. As the garlic begins to grow it will sprout leaves. Eventually they will turn brown die.  This is good though, it means it's time to harvest the garlic.
Simply dig out the garlic and hang the bulbs in a cool, dry location to allow them to dry.  After about a week the garlic should be dry.  Now you can clean it off and cook your favorite recipe.

Would you try to grow your own garlic?

Saturday, September 1, 2012

A New Look For Only $0.96!

While I was organizing my new place I came across a piece of furniture that I didn't have much use for.  It was an old shelf that I have had for a while.  I remember when I was a kid we had it in our house, at that time it was a dark stained wood.  A while back my mom gave it a new life by painting it white and putting on a some new white knobs with a flowery design.  In my new place though I didn't have any place where this shelf would look good.  I got to thinking and decided to give this old shelf a facelift.
 I started by taking the shelf outside and with a drop cloth behind it I spray painted a fresh coat of black paint that I purchased for only $0.96.
 After I allowed the shelf to dry I brought it inside.  I didn't need to buy new knobs since I had some old knobs saved from old furniture.  I had both silver and brushed brass knobs to choose from.  After trying both I decided the brushed brass looked better.
 
Once the shelf was fully dry it was ready to hang.
  
I decided to use my new shelf as an addition to my homemade bar.  Now I have somewhere to display my glasses in the same area.
The shelves also come in handy for a bar idea.  They are the perfect size to hold bottle openers, cork screws  and bottle stoppers.
    Here is the whole bar area now.

 So for only 96 cents I was able to breathe new life into an old shelf and spruce up my new home.

Thoughts?

Sunday, August 19, 2012

A Fresh Coat For $3.99!

I HATE white walls.  For me a house, apartment or condo with floor to ceiling white walls just doesn't work.  No amount of artwork, photos, trinkets or drapes can make the place feel homey.  When I moved into my new place I wasn't to excited to see bright white.. everywhere!  Before I moved in I painted the master bedroom and living room a neutral beige tone.  Instantly the whole place had a different feel.  I used the above mentioned accessories to pull it all together and without  painting all the rooms I was able to turn it into a home.
 
The only other down side was the back splash in the kitchen.  It was a horrible deep yellowish color that should be named "puke yellow".  At around 2am last night while organizing my kitchen I decided I really hated it and thought..why don't I just paint it?  While trying to save money after a big move it occurred to me that I still had half a bucket of beige paint. 

I was a little nervous because most of the back splash was wall, but there were two shelves made of pressed wood I'm guessing and covered in laminate.  Since I was awake last night when I had this idea I decided to stay up ten more minutes and tape it off.  This way in the morning I could paint.

After a quick trip to the store to buy a paintbrush I was in business.  Two coats later and a little dry time, I had a whole new kitchen.  A coat of paint can truly change something's appearance.  It can also give the space a whole new feeling.


Next time you want to make a change to a room think about what you have that you can utilize.  Since I had extra paint laying around the only thing I needed was the brush.  So for only $3.99 I was able to spruce up a kitchen I didn't particularly like.  Now I LOVE my new kitchen!

Here is a look at a room with half of the wall painted.  What a difference!


Any other ideas for making cheap improvements to your space?

Saturday, April 7, 2012

Natural Egg Dye!

It's that time of year again and why not try some natural methods for dying Easter eggs this year. Forget using harsh synthetic colors and dyes, natural coloring derived from food can produce sweet, subtle hues that are sure to please anyone. 


There are three easy methods to dye eggs naturally.

1) Hot Dying Method (use uncooked eggs)
Using a saucepan, add 1 quart water, 2 Tablespoons of vinegar and dye material. Using cold (uncooked) eggs, make sure the liquid covers the eggs. Simmer slowly for 15 minutes before removing eggs to cool.

2) Cold Dying Method (Use cooked eggs)
In a saucepan add 1 quart of water, 2 Tablespoons of vinegar and dye ingredient.  Bring the contents of your sauce pan to a boil.  Reduce the heat to low and simmer for 20-30 minutes.  Strain out your dye ingredient and cool.  Submerge hard boiled eggs into the cooled dye until the color strength you want is achieved.  Turn eggs occasionally to ensure even coverage.  Remove from dye and dry.

3) Silk-tie method: (Use uncooked eggs)
Textile fabrics like silk will release their dye when vinegar is added to the cooking water.
  • Cut silk (like from a tie) into a square large enough to wrap around a raw egg.
  • Place the printed side facing the egg, wrap the the silk around your egg and secure using twist ties.
  • Cut a piece of white fabric larger than the silk piece to go around your egg, then lay the silk-covered egg on the white fabric, bring up the sides and secure again using a twist tie.
  • Place eggs in a glass or enamel pan, cover with water and add 1/4 cup of white vinegar.
  • Bring water to a boil and simmer for 20 minutes.
  • Remove eggs from water using tongs and allow to cool.
  • Remove fabrics from eggs and let them continue to cool on a rack.
For each color, use one of the suggested dye materials per 1 quart of water.  For amounts not provided below, use enough dye material to create the desired color.  Keep in mind that color of the egg will be lighter than the color of the dye bath.

Yellow:
  • Orange or lemon peels, boiled
  • 2 Tbsp ground tumeric
  • Chamomile tea or Green tea
  • 4 cups yellow onion skin (makes a yellow/orange color)
Orange:
  • 4 Tbsp paprika
  • Grated carrots
  • 3 Tbsp chili powder (makes a red/orange color)
Pink:
  • 1 cup chopped fresh beets
  • Cranberries or cranberry juice
  • 4 cups red onion skin
  • Red grape juice or Red wine
Lavender:
  • Purple grape juice
  • Red tea
Violet Blue:
  • Red wine
  • Violet blossoms
  • Red onion skins
Blue:
  • 1&1/2 cups blueberries, fresh or canned
  • 4 cups red shredded cabbage
Green:
  • 1 cup blueberries (add grape juice for more intensity)
Gold/Brown:
  • Dill seeds
Mocha:
  • 1 quart strongly brewed coffee or strong black tea
TIPS:

You can make a drying rack by cutting up a paper towel tube into rings and allowing your eggs stand on rings to dry.

Give your eggs a glossy finish by rubbing a little vegetable oil on them using a paper towel once they are dry.


* Refrigerate your cooked eggs! You do not want to keep your eggs out of the refrigerator for more than 2 hours.  Throw away eggs that have been out too long, better safe than sorry!

What do you think?  Have you ever colored your Easter eggs naturally? Would you ever consider using natural ingredients to make dyes verse synthetic dyes you buy in stores?

Tuesday, December 7, 2010

Tuesdays Tip! for dry skin

As the dry winter air starts to surround us it begins to take a toll on our skin.  Already I am suffering from dry/itchy skin as well as chapped lips.   For the past few weeks I have started keeping a bottle of inexpensive olive oil in my shower.  After I bath or shower I pat dry with a towel then lather on a few tea spoons worth of oil over my body and face.  It is a great moisturizer for your skin and will keep it silky smooth.  If you do decide to apply it on your body while still in the shower or tub make sure to be careful next time you enter as there may be a slippery residue. 

I have also been making my own facial exfoliating scrub with whats in my kitchen cabinet.  Once or twice a week I apply a mixture of about two tablespoons of olive oil and one teaspoon salt.  I use course salt and gently massage the mixture for about a minute than rinse with warm water.  If you do not have course salt you can use table salt as well as brown sugar.  The olive oil will leave your skin radiant and smooth without causing you to breakout.

When it comes to chapped lips winter is my worst enemy.  It seems as though every year when Thanksgiving rolls around my lips all of a sudden become dry and flaky.  I have found what works for me is Cocoa Butter with Vitamin E.  I even keep a small container in my purse.  I use a small container that you can buy at a drug store or container store that mimics a lip gloss container.  I fill it with the cocoa butter and have a travel size lip treatment I can take with me anywhere.


Have you ever tried any of these remedies?  Do you have any other at home treatments you use?