Showing posts with label Simple Secrets. Show all posts

Tuesday, October 20, 2015

How To Roast Pumkin Seeds!

I must admit, my favorite part about carving pumpkins is getting to roast and eat the seeds! They are so yummy and easy to make.  Below is my simple and easy recipe for making the perfect roasted pumpkin seeds.


What you need
  • 1 Medium Sized Pumpkin
  • Colander
  • Medium Bowl
  • Baking Sheet
  • Tin Foil
  • Paper Towel
Ingredients
  • 2 Tbsp Olive Oil  
  • 1/2 Tsp Kosher Salt
Empty the "guts" of your pumpkin into a colander.  Under cool running water clean the pumpkin seeds, removing any pumpkin pieces.  Once your seeds are clean, lay them out on a paper towel and pat them dry.  This will help them bake easier and more evenly.  Once you are done drying the seeds place them in a medium sized mixing bowl.


Add the Olive oil and Salt, then toss or stir until the seeds are evenly coated.

Once coated, evenly spread out your pumpkin seeds on a baking tray lined with tin foil.


Bake your seeds at 300'F for 40 minutes, stirring after 20 minutes, or until golden brown.


 ENJOY!

Saturday, August 8, 2015

Why your girlfriends can be your best ally in health!

August is a great month! Aside from my birthday being in August, we also get to celebrate National Girlfriends Day!  There is nothing like a strong female bond.  Every woman has that one special friend or group of friends that she can confide in, share with, grow from, celebrate with, learn from, mourn with and have fun with! 

“Friendship between women is different than friendship between men. We talk about different things. We delve deep. We go under, even if we haven’t seen each other for years." — Jane Fonda
Why your girlfriends can be your best ally in health!

Girlfriends can offer great support:
Whatever the issue, your girlfriends are always there to support you.  It's no different when it comes to your health.  We have all experienced going out or going to a gathering when trying to eat healthy, where everyone is indulging and you try your best to satisfy yourself off that one tray of veggies and dip, order a salad and watch everyone else eat a mouth-watering meal in front of you - or avoid the situation entirely and stay home because you feel uncomfortable.  Great friends should support your efforts and encourage you.  What better way then to all support one another in bettering your health!  
We all know we need to take care of our bodies and a big way is by what we put into it.
  Instead of making get-togethers about going out and indulging, instead use it as a time to enjoy a nice healthy meal and catch up with one another.  It is always easier to stay focused and on track when you have another's support, or you do something together. Encouraging each other to eat healthier will make it easier to avoid temptation and motivate you to take care of yourself.  
 Another great way to do that is to shop together. When you shop alone, it's easier to load the cart with items you know you shouldn't.  Making a point to stock up on healthier food with friends helps you stick to getting what it is you really want and not being tempted. Besides, she can always put that platter of cheesecake back on the display when you are not looking.  Another reason I love shopping with friends is that you learn new things.  There are many things I know about food that my friends don't and vice-versa.  While I can help my friend understand the difference between cooking oils, she can inform me on an ingredient in one of my packaged foods I didn't know about.  It's also a great way to learn about new foods, products or meals. I love finding new things or ways to prepare different foods from my friends.

Girlfriends can motivate you:We all know how hard it is to maintain an active lifestyle.  You join a gym, you go for a few months, never to be heard from again.  You buy that workout DVD and use it once.  For many reasons, it's hard for women to stay motivated, find the time, or have the energy to work out.  Making it a priority to be active together will make it easier and more fun.  It's a lot more enjoyable to go for a walk and talk with friends than trying to force yourself off the couch to take a walk.  Make dates to do fun activities.  You don't have to join a gym together to "work-out".  Doing a dance workout in front of the TV becomes more of a party and less of a work out when you can laugh and have fun with your friend. This will also help hold you accountable, since it's easier to break plans with yourself. Even if you can't get together all the time to work out, encouraging one another is great as well.  My best friend lives three states away right now, so we don't have the option to take a bike ride together or go on a hike, but we encourage each other to keep up with our efforts.  We also participate in fun activities when we can - getting together to tackle 5k's with obstacles is one of our favorites.  
Taking on something like that is a lot less of a workout and more fun when you do it with friends.  Though I couldn't be with her a few years ago as she trained for a physical exam, I sent weekly encouragement cards to help keep her motivated. I love that she still displays them on her fridge today!

My cousin Nikki is a great inspiration and a wonderful example.  She is a teacher, wife and mother to two young girls (three and one), yet still finds time to be active and stay in shape.  
She is always posting photos of her activities with her friends.  They get together to work out, run, train and support one another.  What's even more amazing is that they do it with their children!   


Girlfriends can endure with you: 
We all know that there are certain things you only tell your best girlfriends!  We are sometimes most comfortable talking about 
 personal health issues with them.  I know I'm more likely to talk to my friend about female issues rather than my husband.  Every year that passes, it becomes more and more important to be on top of your health and preventative care.  Unfortunately, many woman don't pay enough attention to their own health until it's too late.  Whether you can't find the time or would just rather avoid a trip to the doctor, this is a great opportunity to do something together that could potentially save your life.  Going together can take the stress out of it and make it more relaxing.  Especially as it comes time for things like the dreaded mammogram, turn it into a yearly routine and go with your best friend.  I have gone and supported my friend at the dentist because she is particularly not fond of going there. Your friends are usually the ones you can rely on to be brutally honest with you as well! They can be great at calling your attention to matters you may be ignoring. 


It's always nice to not go it alone, especially when you are trying to break bad habits.  Quitting smoking can be a rather hard experience, but doing it alongside a friend can make the process much easier.  Maybe you want to cut down one your drinking? Having that support and ally can help you more easily make lifestyle changes that affect your health. 


When you come together and support one another you can accomplish great things! I am lucky and grateful to have wonderful friends in my life! Check out the infographic below from Oscar Health Insurance Company. They're a new insurance company looking to help their members be proactive of their health. I hope their checklist will help inspire you to make healthy choices with your girlfriends! If you're in their area, check out their health insurance plans in New York and New Jersey.


How can you be an ally to your friends?


Wednesday, April 1, 2015

How To Naturally Dye Easter Eggs!

It's that time of year again and why not try some natural methods for dying Easter eggs this year. Forget using harsh synthetic colors and dyes, natural coloring derived from food can produce sweet, subtle hues that are sure to please anyone.


There are three easy methods to dye eggs naturally.

1) Hot Dying Method (use uncooked eggs)
Using a saucepan, add 1 quart water, 2 Tablespoons of vinegar and dye material. Using cold (uncooked) eggs, make sure the liquid covers the eggs. Simmer slowly for 15 minutes before removing eggs to cool.

2) Cold Dying Method (Use cooked eggs)
In a saucepan add 1 quart of water, 2 Tablespoons of vinegar and dye ingredient.  Bring the contents of your sauce pan to a boil.  Reduce the heat to low and simmer for 20-30 minutes.  Strain out your dye ingredient and cool.  Submerge hard boiled eggs into the cooled dye until the color strength you want is achieved.  Turn eggs occasionally to ensure even coverage.  Remove from dye and dry.

3) Silk-tie method: (Use uncooked eggs)
Textile fabrics like silk will release their dye when vinegar is added to the cooking water.
  • Cut silk (like from a tie) into a square large enough to wrap around a raw egg.
  • Place the printed side facing the egg, wrap the the silk around your egg and secure using twist ties.
  • Cut a piece of white fabric larger than the silk piece to go around your egg, then lay the silk-covered egg on the white fabric, bring up the sides and secure again using a twist tie.
  • Place eggs in a glass or enamel pan, cover with water and add 1/4 cup of white vinegar.
  • Bring water to a boil and simmer for 20 minutes.
  • Remove eggs from water using tongs and allow to cool.
  • Remove fabrics from eggs and let them continue to cool on a rack.
For each color, use one of the suggested dye materials per 1 quart of water.  For amounts not provided below, use enough dye material to create the desired color.  Keep in mind that color of the egg will be lighter than the color of the dye bath.

Yellow:
  • Orange or lemon peels, boiled
  • 2 Tbsp ground tumeric
  • Chamomile tea or Green tea
  • 4 cups yellow onion skin (makes a yellow/orange color)
Orange:
  • 4 Tbsp paprika
  • Grated carrots
  • 3 Tbsp chili powder (makes a red/orange color)
Pink:
  • 1 cup chopped fresh beets
  • Cranberries or cranberry juice
  • 4 cups red onion skin
  • Red grape juice or Red wine
Lavender:
  • Purple grape juice
  • Red tea
Violet Blue:
  • Red wine
  • Violet blossoms
  • Red onion skins
Blue:
  • 1&1/2 cups blueberries, fresh or canned
  • 4 cups red shredded cabbage
Green:
  • 1 cup blueberries (add grape juice for more intensity)
Gold/Brown:
  • Dill seeds
Mocha:
  • 1 quart strongly brewed coffee or strong black tea
TIPS:

You can make a drying rack by cutting up a paper towel tube into rings and allowing your eggs stand on rings to dry.

Give your eggs a glossy finish by rubbing a little vegetable oil on them using a paper towel once they are dry.


* Refrigerate your cooked eggs! You do not want to keep your eggs out of the refrigerator for more than 2 hours.  Throw away eggs that have been out too long, better safe than sorry!

What do you think?  Have you ever colored your Easter eggs naturally? Would you ever consider using natural ingredients to make dyes verse synthetic dyes you buy in stores?

Monday, October 20, 2014

How To Make Chicken Stock!

This is a simple and easy stock recipe using your leftover chicken bones.  I tend to roast whole chickens often and I always try to get more bang for my buck by using the remnants from one nights dinner to stock up on this basic kitchen essential.  What's great about making homemade stock is that it's one of those "set it" and "forget it" kind of recipes.  All you need to do is basically throw all the ingredients in a pot

Ingredients:
Leftover chicken bones and skin
3 or 4 carrots (quartered)
1 large (unpeeled) onion (quartered)
3-4 pieces of celery (quartered)
A handful of fresh parsley with stems
2 bay leaves
8-10 peppercorns
2-4 garlic cloves (crushed)
cold water 
Thyme (fresh if possible)
1/4 tsp Salt
1/4 tsp Pepper

Optional ingredients:
Other herbs
1 Parsnip (quartered)
1 leek, white part only(cut in half)

What you need:
Stock pot or Large Pot
Strainer
Mesh strainer or cheese cloth


Place the chicken, vegetables, and herbs in your pot and fill with cold water. 
I usually follow this basic recipe, sometimes depending on what I have I may add the parsnip or leek to the mix. If I have fresh herbs I will add a few stalks of thyme and even a little oregano or basil.  If not I always add a large pinch of dried thyme and maybe a pinch of the other spices as well.  I have a spice blend "Mural of Flavor" and "Herbs De Provence" that I usually add as well. Really you can tweak the basic recipe however you like.


Bring the water to a boil and then reduce to a slow simmer.
Allow it to simmer uncovered for at least 4 hours, 6-8 hours will yield the best results and flavor. Add hot water throughout as needed to ensure the water level stays above the bones and vegetables. You can also skim any fat off the top occasionally with a spoon or fine mesh strainer if desired.

Strain the stock.
 I like to strain the stock through a colander into another large pot first.  I find it makes removing all the bones and veggies easier.  Once the solids are discarded I rinse out my original pot, then pour the liquid back into it through a fine mesh strainer. If you want you can strain it even more by passing it through the mesh strainer again or even pouring it trough the mesh strainer lined with cheese cloth.

Store the stock.
You can store your stock in a glass or plastic container with a lid in the refrigerator for a few days.  If you don't plan on using it right away the stock can be stored in your freezer for a few months in a plastic container or bag. I sometimes make "stock cubes" for an easy way to add flavor into recipes. 


Tip:
If you want to remove more of the fat from your stock, simply place it in the refrigerator before portioning it into containers for storing.  Once the stock fully cools the fat will rise and solidify on top making it easy to skim off with a spoon.

Chicken stock is a great base for soups and sauces.  I also love using it as the liquid when making quinoa and couscous.  It also comes in handy when I make gravy, mashed potatoes or I want to steam vegetables.  For even more ways to utilize your stock you can check out this list of 25 tasty ways to use chicken stock from Wisebread.com.

What is your favorite way to use chicken stock?


Tuesday, October 7, 2014

How To Make Almond Milk!

Many people seem to be switching over to nut milks lately. One of my favorites is Almond Milk! It is a great substitute for dairy milk but is also great all on its own.  I very rarely drink dairy milk these days and always seem to have Almond milk in my refrigerator.  I tend to use almond milk most often for protein shakes and smoothies.  It has a wonderful flavor and a creamy consistency with less fat and calories than dairy milk.

Bonus: Almond milk contains a wide variety of essential vitamins and minerals!


 I have been drinking nut milks for some time now and I find myself less and less likely to buy them from a store.  The basic ingredients consist of the chosen nut, water and sweetener, yet its hard to find a brand with that few ingredients.  Obviously they would need to include a preservative to help keep them shelf stable but I don't like buying things, even "healthy alternatives" riddled with chemicals and ingredients I can not pronounce. You may think it would be a hard and time consuming ordeal to make your own fresh almond milk, however it is not. How do you make almond milk? Here is my quick and easy guide to making fresh homemade, creamy, delicious almond Milk! 

Bonus: Aside from avoiding unwanted chemicals you will save money too!


What do you need to make almond milk?

You can make as much or as little as you want.  When making almond milk you can choose to use blanched almonds (skins removed) or regular almonds (skin still on). The only difference between using almonds with or without skins when making almond milk is that you may need to strain your milk a bit more if you use regular almonds.  I don't find that it changes much.  For this post I made a small batch. I used one small bag of regular Almonds (about 1 cup)


Ingredients
Raw Almonds (uncooked & unsalted)
Filtered Water
Vanilla
 *Sweeteners if desired (dates, honey, agave, maple syrup or cinnamon) 1tsp or to taste

Equipment
Bowls
Mesh Strainer
Blender or food processor
Cheese cloth or Nut bag


To make almond milk there are only a few easy steps.

Soak the almonds.  You want to soak your almonds overnight for at least 8 hours. To do this place your almonds in a container or bowl, then fill with filtered water.  You will want to add about an inch or two of water above the almonds since they will absorb the water and grow in size.

Drain the almonds. After the almonds have soaked you want to drain and rinse them under cool water. 


Blend the almonds. Pour your almonds in a blender and cover with water. I like to use about a 3-1 ratio during this step.  If I started with 1 cup of dry Almonds I would add about 3 cups of filtered water to the blender.  For 2 cups of dry almonds I would use close to 6 cups of water.

Blend the almonds and water on the highest speed for at least 2 minutes. Your almonds should completely break down and the liquid should be white and opaque.  

Strain the almonds. Place a fine mesh strainer lined with cheese cloth over a bowl and pour the almond/water mixture through it.  Once all the liquid has drained through, gather the excess cheese cloth and twist the remaining almond meal into a ball to remove more liquid.  You can continue to twist and squeeze more liquid from the pulp with your hands.


Sweeten the milk. Once you have finished straining all the liquid you will want to taste it.  If you prefer a sweeter flavor you can add a flavoring and or sweetener Pour the liquid back into your blender, add the flavoring or sweetener and blend for about 15 seconds.  For this post I added a tsp of vanilla to my milk.  If you like you can quickly strain the milk again to achieve an even cleaner finished product.

Store your almond milk. You want to store your almond milk in sealed container in the refrigerator.  Your almond milk should last for about 3-5 days since there are no chemicals or preservatives.  This also means that your milk will settle.  You will want to shake the milk up before each use.  If you notice it tastes at all sour you will want to discard it and make a fresh batch. 


TIP: Don't just throw away the remaining almond meal that is left behind.  It can be added to a multitude of things such as cookies, muffins, oatmeal, pancakes and smoothies. You can dry it as well in the oven then freeze for future baking needs.  Stay tuned for posts about ways to use left over almond meal.

Do you drink nut milks? Would you consider making your own?

Tuesday, January 28, 2014

Homemade Citrus Soda!

Tired of drinking glass after glass of bland water? Since I don't drink soft drinks or fruit juices filled with tons of sugar and calories I am always coming up with new ways to enjoy water!  Don't get me wrong, I love water! Drinking water comes with so many benefits, I think the only disadvantage would be like anything else too much could kill you..lol.. seriously don't worry, that would be hard to do. Anyways.. sometimes you want something different maybe with carbonation or a little flavor! Like with my Apple Cinnamon Water here is another fun way to spruce up your everyday water, this time with carbonated water. Citrus Soda!


All You Need:
  • Bottle of carbonated water
  • Pitcher
  • Sliced citrus fruit (I like to use Oranges, Lemons & Limes)
To Make:


  •  Slice fruit and place in bottom of pitcher
  • Fill with carbonated water
  • Cover with ice
*You can drink it right away but the longer it sits the more citrus flavor it will have


* I actually make this beverage two different ways, you can also just add the fruit to your bottle of water (after removing some of the water of course) which makes it portable.

Tip- If you leave the fruit in your water too long it will take on a unpleasant rind taste.  If you don't finish your soda within 24 hours remove the fruit to keep the flavor from turning.

Tuesday, January 21, 2014

How To Temper Chocolate!

I never really thought about tempering chocolate.  Even when I started to make chocolate covered snacks I didn't think it was necessary for the recipes I was creating... I was wrong.  The main reason I began to research tempering chocolate was because I couldn't get my chocolate covered berries not to melt within seconds of putting them in my hand.  Aside from raising the melting temperature so your chocolate melts in your mouth, not in your hands, tempering has a few other advantages.

  • You will avoid fat and sugar bloom, the unappealing white streaks and or blotches that can unattractively take over perfectly good chocolate.
  • Tempered chocolate cools faster
  • It gives your chocolate a shiny, glossy appearance.
  • Your chocolate will have a clean snap when you break it.

It seems like a daunting task but it really isn't.  Also since I don't make large quantities at a time the heating and cooling process is very short. 
  1. Use a double boiler or just rest a metal bowl over a saucepan with 1 inch of water.  Bring the water to a simmer, then add half of your chocolate to the bowl and stir till its smooth and melted. Put the other half of your chocolate to the side for later. Using a thermometer bring your chocolate to the correct temperature: 115°-120° then remove it from the heat.
  2. Now you want to add the other half of the chocolate you put aside. This is the seeding process and helps to bring the chocolate temperature down. Continue to stir until smooth. 
  3. The last step is to bring your chocolate back up to the perfect temperature, for most dark chocolate it's between 88° and 91°.  To do this just place the bowl back over your hot water and stir till you reach the desired temperature.  Then you are done and ready to create whatever chocolate creations you can dream of.
 *You can also temper chocolate using your microwave like in this instructional video below

Tuesday, January 14, 2014

How To Clarify Butter!

What is clarified butter? Clarified butter (also known as ghee) is butter with the milk solids and water removed.  It is a great choice for cooking and able to withstand higher temperatures than regular butter or other oils such as coconut oil.  Clarified butter is one of my favorite things to cook with when eating Paleo, it adds a great mild buttery flavor and is simple to make. literally..
Step 1: Melt
Step 2: Strain
Step 3: Store


While it may seem like a lot of work or a hassle it is quite easy, quick and last for a while. Plus it could help your digestion, improve your flexibility, boost your immune system and moisturize your skin!

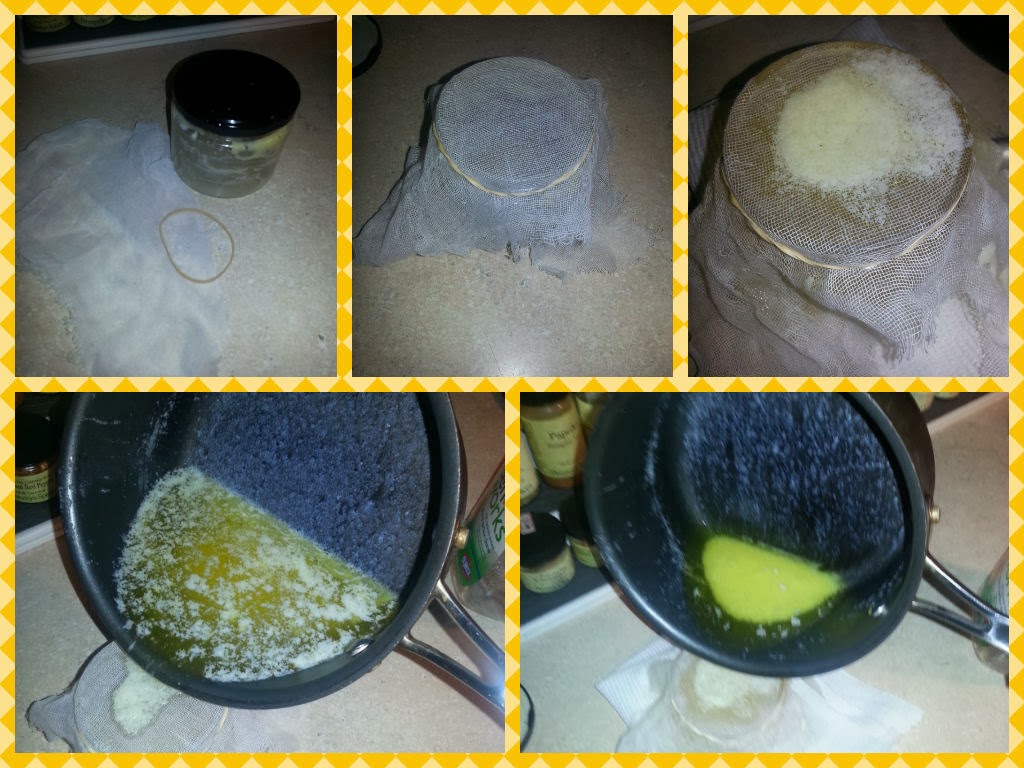
1. You want to heat your butter in a saucepan over low heat until it melts. Then allow it to simmer as the white "foam" rises to the surface.  I usually make a pound at a time. (though it is less than a pound once clarified)
2.  Once the all the foam has risen (this takes about 10 minutes) you will have three layers.  All the milk solid sediment will be at the bottom of the pan with a layer of golden liquid under the foam. You can skim the foam off with a slotted spoon but I don't like to do it that way.  If you want to skim it off as it forms i suggest using a mesh skimmer.  I prefer waiting the 10 minutes and then straining it though cheesecloth.


4. Using a rubber-band I just secure the cheesecloth around the opening of my "clarified butter jar" and slowly pour the butter into the jar. You will notice the white foam being trapped on top of the cheesecloth. You also want to leave behind that bottom layer of solids so stop straining when you get to the end of the clear liquid gold.


* Clarified butter will keep for 3 to 6 months in the refrigerator, you can also leave it at room temperature on your counter like I do if the conditions are optimal, or freeze it for a similar length of time.


  • * Traditionally, you will find that you should use unsalted Butter when clarifying butter. While I have made it using both salted and unsalted I traditionally use salted.  I don't find that the salt is intensified after being clarified but it may be because I strongly dislike unsalted butter to begin with.

  • Would you clarify your butter?

    Wednesday, December 11, 2013

    Beef Bones For Dogs!

    I have some beef bones left over from a recipe and decided to up-cycle them into a new treat for my dog.  The bones weren't backed or broiled so they wont crack and splinter.  They came from a stew so not only are they still strong but they have flavor cooked in already.

    I pulled them aside and then just boiled them in water to remove the rest of the marrow and meat that was attached
     

    After I removed them from the water I rinsed them under running water to remove any pieces that were still attached.  I had pulled three large bones from my recipe to turn into dog bones but ultimately only kept two.  One of the bones had a lot of course splinters that could not be removed and would be harmful if my dog ingested them.  I DO NOT recommend giving your dog any bones that may break or splinter off.  The bones I kept were both strong, smooth and appropriate for his size.


    It is a very quick and easy process and now Ozzy has two new beef bones that will keep him busy for a long time.  This is the first time I have "made" bones for him.. I think he likes them!


    Would you up-cycle beef bones for your dog?

    .

    Tuesday, December 10, 2013

    Cracked Black Pepper Always On Hand!

    Here is a quick and easy simple secret.

    Almost every type of recipe imaginable calls for a pinch of black pepper. Many specify cracked black pepper.  I always keep a dish of sea salt and black pepper next to the stove so they are easily accessible when I cook.  I found myself cracking fresh black pepper into a separate dish when I made recipes that called for specific amounts of cracked pepper.  A while ago I decided to mix my black pepper with cracked black pepper in the dish by the stove and now I always have fresh pepper on hand.  It is also supper easy when I need to scoop up a teaspoon worth for a recipe.  


    Tuesday, October 8, 2013

    How To Properly Hard Boil An Egg!

    Have you ever wondered why egg yolks sometimes get a green/grey tint? Or, do you know how long to boil an egg before it's done?


    Most people probably think boiling an egg is pretty easy and that there isn't a wrong way to boil an egg. Heat water, add eggs and you're good! Well it turns out that color distortion comes from eggs being over cooked.  Want to know how to keep your egg yolks yellow?

    Here are the simple steps to ensure your hard boiled egg yolks always come out bright and yellow.

    1. Place your eggs on the bottom of your pot in a single layer.
    2. Cover the eggs with water from your faucet. (water should be an inch or so above the egg layer)
    3. Bring water to a boil over high heat then turn off burner.
    4. Cover with a lid and let eggs sit. (12 minutes for smaller eggs & 15 minutes for larger eggs)
    5. To stop the eggs from cooking using a slotted spoon transfer them to an ice bath (a bowl of ice and water) until they are cool to the touch. 
    6. Then enjoy or place in the refrigerator for later.


    Tuesday, October 1, 2013

    Tuesdays Tip: Apple Cinnamon Water!

    So I came across this idea when my father posted a link on my Facebook wall last week. It claimed this beverage would boost your metabolism naturally with this zero calories. They claimed it is a detox drink that will give you tons of energy and help you loose weight if you drink 8 oz before each meal.

    I'm not sure how much of all that I believe but the beverage itself sounded interesting so I figured I would give it a try.  It tasted great and now I continually make it.  It is what I call a  "great fall water".  I usually always add lemon to my water and in the summer time often add limes and oranges.  This is a great way to change up my water for the colder months and it has great flavor.  It is also a fun festive way to serve water at the dinner table when you have company.


    You need:
    1 Apple thinly sliced
    1 Cinnamon Stick

    A Pitcher

    Drop apple slices in the bottom of the pitcher add the cinnamon stick and cover with ice about 1/2 way up then add water. Store in refrigerator.


    Since I really only drink water I tend to go through a pitcher a day.  I find that I can use the same apples and cinnamon stick for a few days.  Eventually the apple slices will begin to disintegrate and need to be replaced.  


    Tip: If there is not enough cinnamon flavor for you add another cinnamon stick.  For more flavor you can also mix in some powdered cinnamon if you don't mind a bunch of floating specs in your water.


    Would you try this "fall water"?

    Friday, September 27, 2013

    Unrefined Virgin Coconut Oil!

    With so many type of oils out there how are we supposed to decipher the good oil from the bad? Well, First off, eliminate vegetable oils high in polyunsaturated fatty acids and Omega-6. These are the types of oils that are not good for you. For example: vegetable oil, corn oil, peanut oil, soybean oil , grape seed oil, cottonseed oil, safflower and sunflower oil.


    Learning to eat Paleo you pick up on a few things, like how good fats don’t actually make you fat and are actually healthy.  Paleo eaters rely heavily on consuming good fats, it’s our main source of energy. Our bodies are said to be designed to run primarily on fat as a source of energy. Coconut oil is an edible oil, like olive oil that is extracted from the meat of coconuts. The oil is made up of around 90% saturated fat, 6% monounsaturated fat, and 3% polyunsaturated fat which allows it to stay stable under high heat.  This is also why it is great to cook with.


    Using coconut oil for cooking is becoming more and more popular. I actually began using unrefined virgin coconut oil in my cooking long before I made the jump to a Paleo lifestyle.  When I began eating Paleo I quickly learned that although you can consume olive oil at room temperature, for example, drizzled over a salad, you are not supposed to cook your food with it.  Since I used olive oil in many of the dishes I prepared,  I began supplementing the coconut oil in it's place and opening up many more possibilities for cooking with it.  The difference from most oils you are probably used to cooking with is that coconut oil is solid at room temperature. I use this oil now for most of my stove top cooking.  It is great for sauteing vegetables and frying eggs.  It will leave a great subtle coconut flavor and smell that is not overpowering to your dishes.  I also use it in some of my grain free baking.

    Using coconut oil in your cooking can also positively affect your health. Here are just a few examples of how:

    • Boosts your metabolism 
    • Aids with weight loss.
    • Increases your digestion 
    • Helps you absorb fat-soluble vitamins.
    • Improves your heart health 
    • Supports your immune system.
    • Positively affects your hormones for thyroid and blood-sugar control. 
    • Promotes healing & tissue repair.
    • Helps protect against kidney disease and bladder infections.

    Coconut oil also has many other uses outside the kitchen check out these 160 uses for coconut oil.


    If you are unsure or curious I encourage you to buy a jar and substitute it in a few of your recipes   You may just be pleasantly surprised.  There are many brands of coconut oil on the market.  I tend to buy the brand Spectrum that's pictured above on the left.  It is reasonably priced and has worked well for me for many different uses.

    Would you cook with coconut oil?


    Wednesday, April 10, 2013

    Homemade Pesto Recipe!

    I love pesto! Lately I have had a lot of basil growing in my garden anda have been finding many uses for it.  Before I left on a trip I wanted to be able to use the large amount I had growing for fear it may die while I  was away.  Right away I thought about making pesto.  At first I wasn't sure if the large amount I had was even enough to make a decent amount of pesto.  After some reading I knew it would be a perfect way to transform my basil into numerous delicious meals in the future.  It is a simple and easy process anyone can do.  Here is recipe for how to make pesto.


    40 Basil leaves 
    (you can add parsley if you like or if you don't have enough basil)
    1/4cup Romano cheese
    (you can also use Parmesan)
    2 cloves of garlic
    1/4cup pine nuts
    (optional) 
    2Tbsp Olive Oil
    2Tbsp Extra Virgin Olive Oil
    (you may need to add more oil to get the desired consistency) 
    A Dash of Salt


    I start by putting my Basil leaves and Olive Oil in my Ninja Blender and pulse a few times to break down the leaves. You can use any sort of blender or food processor.

    Next I add the cheese, garlic, salt and pine nuts if desired, then pulse the blender a few more times.
    The last step is to add the Extra Virgin Olive Oil (you can use more olive oil or canola oil if desired or if you don't have EVOO).  I add it slowly and blend the pesto in between to reach the desired consistency.  I like my pesto to resemble a thin paste.


    Then Enjoy! 

    There are so many uses for pesto.  You can use it as a sauce, a spread, a drizzle or as an ingredient in so many dishes.  I love it on pasta or as a spread in a caprese panini.

    Have you ever made your own pesto? 

    Tuesday, December 11, 2012

    Tuesday's Tip! How To Make Buttermilk!

    Buttermilk is not something I usually have on hand in my kitchen.  I usually know beforehand if a recipe I am making calls for it. That being said, we’ve all been there when we come across a new dish we want to try or we get mid-recipe and realize that its calls for an ingredient we don't have.  This happened to me the other night and I know like most people I don't want to run out to the grocery store for just one item.  The best thing about being out of buttermilk though is that you can easily make do with a simple at home substitute. There are a few ways to make your own buttermilk, but I have always stuck to the old school, tried and true, and simplest way.  All you need is two ingredients and five minutes.


    Ingredients:

    • Milk (just under one cup)
    • 1 Tablespoon white vinegar or lemon juice (I have always used vinegar)
     
    1. Add one Tablespoon of white vinegar or lemon juice in a liquid measuring cup.
    2. Add enough milk to bring the liquid up to the one-cup line.
    3. Let stand for five minutes. (It will start to look curdled)
    4. Stir and use.


    TIP: If you have heavy cream on hand, use that in place of the milk and you will have real buttermilk

    Tuesday, September 25, 2012

    Tuesday's Tip! Storing Fresh Mozzarella!


    I love using fresh Mozzarella whether I'm making a caprese salad or a homemade pizza, but I don't always use it all in one recipe.  A lot of people are nervous about saving fresh mozzarella and how you can safely store it.

    The best thing to do is only buy as much fresh mozzarella as you think you will need for a recipe or that you will be able to use in a few days.  If you have some left over the best thing to do is store it in a small air tight container.  I usually fill the container with tap water so that the mozzarella is covered and add a pinch of salt.  It will keep like this in the refrigerator for a few days.

    Saturday, September 15, 2012

    Easy Marinade!

    Here is an easy marinade you can use for a last minute steak dinner or to give your meat dish a little extra flavor.
    Using a Ziploc bag or air tight container place your meat inside with the following.
    1 cup olive oil
    1/2 cup Vinegar
    2 tablespoons paprika
    2 tablespoons black pepper
    2 tablespoons kosher salt
    1 tablespoon fresh minced garlic (or granulated garlic)
    1 tablespoon fresh minced onion (or onion powder)
    1 tablespoon crushed red pepper flakes. 
    Refrigerate for 30 minutes to 24 hours then prepare meat as desired.